Chapter 2: Deploy BinderHub
All commands in this chapter are run on the machine that has kubectl and helm access to the cluster:
| Setup | Where to run |
|---|---|
| Google Cloud (GKE) | Google Cloud Shell |
| Self-hosted (MicroK8s) | The main node (control plane) via SSH or directly |
Step 1: Add Helm Repository
helm repo add jupyterhub https://jupyterhub.github.io/helm-chart/
helm repo update
Step 2: Clone Configuration Repository
Clone the deployment configuration:
git clone https://github.com/IntEL4CoRo/binder.intel4coro.de-deploy.git
cd binder.intel4coro.de-deploy
Step 3: Configure Image Registry
The repository already includes a secret.yaml. Open it and fill in your Docker Hub credentials:
registry:
  username: <your-dockerhub-username>
  password: <your-dockerhub-token>
Tip: Alternatively, you can share the
intel4coroDocker Hub account — all previously built VRB lab images are already available under that account and can be pulled directly without rebuilding. Contact us to obtain the login token.
Other registries: To use a registry other than Docker Hub (e.g., GitHub Container Registry, Google Artifact Registry), refer to the official guide: Set up the container registry
Step 4: Review binder.yaml Configuration
Before deploying, review binder.yaml and update these values for your environment:
| Field | Description |
|---|---|
jupyterhub.singleuser.memory | Memory guarantee/limit for user pods |
jupyterhub.singleuser.cpu | CPU guarantee/limit for user pods |
jupyterhub.singleuser.extraResource | GPU resource requests |
config.BinderHub.hub_url | Public URL of the JupyterHub (e.g., https://jupyter.intel4coro.de) |
Shared Storage (Self-Hosted Only)
The binder.yaml includes commented-out volume mounts under jupyterhub.singleuser.storage. These mount host directories into every user pod for shared large files and caches (HuggingFace models, pip packages, Isaac Sim cache, etc.):
# jupyterhub.singleuser.storage.extraVolumeMounts / extraVolumes
# - huggingface-cache  →  /home/jovyan/.cache/huggingface
# - pip-cache          →  /home/jovyan/.cache/pip
# - isaacsim-cache     →  /mnt/isaacsim-cache
These use hostPath volumes pointing to directories on the node (e.g. /srv/binder.intel4coro.de/cache/), which only works in a self-hosted environment where you control the node filesystem. To enable them, uncomment the relevant blocks in binder.yaml and ensure the directories exist on the node with the correct permissions.
Google Cloud:
hostPathvolumes are not suitable for GKE. To achieve equivalent shared storage, replace them with Google Filestore (NFS-backedPersistentVolume) or GCS FUSE mounts, and update the volume definitions accordingly.
Step 5: Deploy BinderHub
The version pinned below (1.0.0-0.dev.git.3506.hba24eb2a) has been tested and confirmed stable for this setup. Newer versions are available but have not been verified.
Google Cloud (GKE) — use binder-gke.yaml. Compared to binder.yaml, this file adds extra initialization steps in the user pod to install and configure Vulkan and OpenGL drivers (ICD loader, libGL, libEGL) so that GPU-accelerated rendering (Isaac Sim, VirtualGL, etc.) works on GKE's Ubuntu GPU nodes, which do not ship these libraries by default:
helm upgrade --cleanup-on-fail \
  --install binder \
  jupyterhub/binderhub --version=1.0.0-0.dev.git.3506.hba24eb2a \
  --namespace=binder \
  --create-namespace \
  -f ./secret.yaml \
  -f ./binder-gke.yaml
Self-hosted (MicroK8s) — use binder.yaml:
helm upgrade --cleanup-on-fail \
  --install binder \
  jupyterhub/binderhub --version=1.0.0-0.dev.git.3506.hba24eb2a \
  --namespace=binder \
  --create-namespace \
  -f ./secret.yaml \
  -f ./binder.yaml
To try a newer version, check https://hub.jupyter.org/helm-chart/#development-releases-binderhub and replace the --version value, then run helm repo update first.
Step 6: Verify Deployment
Check that all pods are running:
kubectl get pods -n binder
Expected output:
NAME                              READY   STATUS    RESTARTS   AGE
binder-84865654fd-dmprl           1/1     Running   0          3m
hub-97bb86b88-rsx6w               1/1     Running   0          3m
proxy-55d986689c-ng8cz            1/1     Running   0          3m
user-scheduler-7b5bf99979-g26ff   1/1     Running   0          3m
user-scheduler-7b5bf99979-rw9ph   1/1     Running   0          3m
Check services:
kubectl get svc -n binder
Expected output:
NAME           TYPE           CLUSTER-IP       EXTERNAL-IP       PORT(S)        AGE
binder         LoadBalancer   10.152.183.224   192.168.1.200     80:30856/TCP   5m
hub            ClusterIP      10.152.183.127   <none>            8081/TCP       5m
proxy-api      ClusterIP      10.152.183.151   <none>            8001/TCP       5m
proxy-public   LoadBalancer   10.152.183.81    192.168.1.201     80:32656/TCP   5m
The two LoadBalancer services — binder and proxy-public — are the entry points for BinderHub and JupyterHub respectively.
- Google Cloud (GKE): GKE automatically provisions cloud load balancers with public IPs. The
EXTERNAL-IPvalues shown above will be publicly routable — you can access BinderHub directly athttp://<binder-external-ip>right away, without any additional networking setup. - Self-hosted (MicroK8s): MetalLB assigns local network IPs (e.g.,
192.168.1.x). These are only reachable within the local network — a reverse proxy or tunnel is needed to expose them to the internet (see Step 6).
Update config.BinderHub.hub_url in binder.yaml to point to the proxy-public external IP:
config:
  BinderHub:
    hub_url: http://<proxy-public-external-ip>
Then re-run the deploy command to apply the change:
helm upgrade binder --cleanup-on-fail \
  jupyterhub/binderhub --version=1.0.0-0.dev.git.3506.hba24eb2a \
  --namespace=binder \
  -f ./secret.yaml \
  -f ./binder-gke.yaml ## or binder.yaml
After this, the service is fully functional — open http://<binder-external-ip> to use BinderHub, which will redirect users to JupyterHub at the proxy-public IP for their sessions.
Step 7: Configure Domain Names and HTTPS
This step is not required for the service to function — BinderHub is already reachable via the LoadBalancer IPs from Step 6. The purpose of this step is to make the service accessible via human-friendly domain names (and HTTPS) instead of raw IP addresses.
Two domain names required: BinderHub consists of two publicly accessible services — the BinderHub frontend (handles repo building and launching) and the JupyterHub proxy (hosts the actual user sessions). Each needs its own domain name, e.g.:
binder.your-domain.org→ BinderHub (binderservice)jupyter.your-domain.org→ JupyterHub (proxy-publicservice)You can purchase a domain from any registrar (Namecheap, GoDaddy, Cloudflare Registrar, Google Domains, etc.), then create two subdomains (e.g.
binderandjupyter).
Google Cloud (GKE)
Reference: Secure with HTTPS.
-
Get a static IP(v4) address that you will assign to your ingress proxy later. For example:
gcloud compute addresses create vrb-gpu --region europe-central2retrieve the assigned IP using:
gcloud compute addresses listoutput:
NAME: vrb-gpu
ADDRESS/RANGE: 34.116.186.50
TYPE: EXTERNAL
PURPOSE:
NETWORK:
REGION: europe-central2
SUBNET:
STATUS: RESERVED -
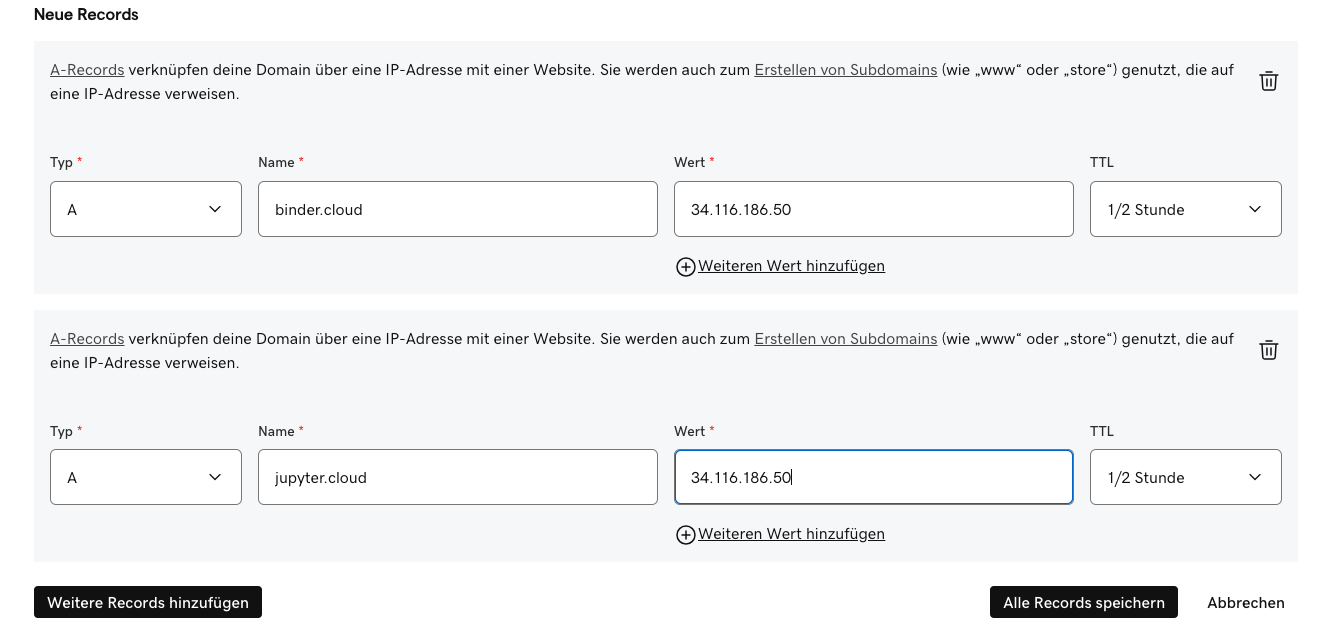
Set A records to your above retrieved external IP, one for Binder and one for JupyterHub. Example of creating A records on Godaddy. Wait some minutes for the DNS A records to propagate.
-
To automatically generate TLS certificates and sign them using Let’s Encrypt, we utilise cert-manager.
Install the latest version of cert-manager:
kubectl apply -f https://github.com/jetstack/cert-manager/releases/download/v1.20.1/cert-manager.yaml -
We then need to create an issuer that will contact Let’s Encrypt for signing our certificates. Modify the file
binderhub-issuer.yamlto replace the placeholder email with yours and instantiate it:kubectl apply -f binderhub-issuer.yaml -
Ingress proxy using nginx
We will use the nginx ingress controller to proxy the TLS connection to our BinderHub setup. Replace the placeholder
<STATIC-IP>in filenginx-ingress.yamlto the static IP you get. Then run:helm repo add ingress-nginx https://kubernetes.github.io/ingress-nginx
helm repo update
helm install binderhub-proxy ingress-nginx/ingress-nginx \
--namespace binder \
-f nginx-ingress.yamlThen wait until it is ready and showing the correct IP when looking at the output of:
kubectl get svc -n binder -
Uncomment all HTTPS configs blocks in
binder.yamland replace all thecloud.intel4coro.dewith your domain,cloud-intel4coro-deaccordingly, then apply the changes:helm upgrade binder --cleanup-on-fail \
jupyterhub/binderhub --version=1.0.0-0.dev.git.3506.hba24eb2a \
--namespace=binder \
-f ./secret.yaml \
-f ./binder-gke.yamlOnce the command has been run, it may take up to 10 minutes until the certificates are issued.
Self-Hosted (MicroK8s)
The MetalLB load balancer assigns local network IPs to the binder and proxy-public services. These IPs are only reachable within the local network. Use Cloudflare Tunnel to expose them publicly without opening firewall ports or requiring a public IP.
Prerequisites: A domain managed by Cloudflare (free plan is sufficient).
Follow the official guide to install cloudflared, authenticate, and create a tunnel:
Create a locally-managed tunnel (CLI)
Cloudflare handles HTTPS automatically — no certificate management required. Both domains will be accessible publicly once the tunnel is running.
Next, update binder.yaml with your domain names as described in the official BinderHub guide:
Exposing JupyterHub and BinderHub
Then apply the changes:
helm upgrade binder --cleanup-on-fail \
  jupyterhub/binderhub --version=1.0.0-0.dev.git.3506.hba24eb2a \
  --namespace=binder \
  -f ./secret.yaml \
  -f ./binder.yaml
Step 8: Test the Complete Deployment
The BinderHub system is now fully deployed. Open your BinderHub domain in a browser:
https://binder.your-domain.org
To verify the full system is working end-to-end, launch the VRB lab test environment:
https://binder.your-domain.org/v2/gh/IntEL4CoRo/binder-template.git/main
This will trigger a full build-and-launch cycle — building the Docker image, pushing it to Docker Hub, and spawning a user session. If the JupyterLab interface loads successfully, the deployment is complete.
Google Cloud (GKE): If the node pool is configured with autoscaling and a minimum node count of
0, the first lab launch may take several minutes while GKE provisions a new node to allocate compute resources. Subsequent launches will be faster as long as the node remains active.Tip: Before sessions with heavy expected usage (e.g., classroom, workshop, demo), warm up the node pool in advance by temporarily raising the minimum node count, so nodes are already provisioned when users start launching labs.
Next:
- Google Cloud (GKE): Deployment is complete — GPU time-slicing on GKE is configured at node-pool creation (see Chapter 1) and does not require the in-cluster setup in Chapter 3.
- Self-hosted (MicroK8s): Continue to Chapter 3 — GPU Time-Slicing to enable multiple users to share a single physical GPU.