Chapter 1: Kubernetes Cluster Setup
Kubernetes (K8s) is a container orchestration platform that automates the deployment, scaling, and management of containerized applications. BinderHub runs on top of Kubernetes — it uses K8s to dynamically launch isolated user pods, each running a reproducible computing environment. A working Kubernetes cluster is the foundation for everything that follows in this guide.
Key Concepts
| Term | Description |
|---|---|
| Cluster | The overall K8s deployment — a set of machines (nodes) managed together |
| Node | A physical or virtual machine in the cluster. Nodes are either the control plane (manages the cluster) or workers (run workloads) |
| Pod | The smallest deployable unit in K8s — wraps one or more containers that share the same network and storage |
| Namespace | A virtual partition within a cluster for isolating resources. This deployment uses the binder namespace for all BinderHub services |
| Deployment | A K8s resource that describes a desired state for a set of pods and keeps them running |
| Service | Exposes a set of pods as a stable network endpoint (IP + DNS name), even as pods are replaced |
| ConfigMap | Stores non-sensitive configuration data as key-value pairs, mountable into pods |
| Helm | A package manager for Kubernetes. BinderHub is installed as a Helm chart (a bundle of K8s manifests with configurable values) |
Recommendation: Option A (Google Cloud (GKE)) is strongly recommended. Self-hosting a cluster (Option B) involves significant manual work — configuring networking, firewall rules, GPU drivers, and ongoing node maintenance. Managed services like GKE handle most of this for you.
For deploying on AWS, Azure, or other managed Kubernetes services, see the Zero to JupyterHub guide: https://z2jh.jupyter.org/en/latest/kubernetes/setup-kubernetes.html
Option A: Google Cloud (GKE)
References: https://z2jh.jupyter.org/en/stable/kubernetes/google/step-zero-gcp.html
Google Kubernetes Engine (GKE) is the simplest and most common way of setting up a Kubernetes Cluster. You may be able to receive free credits for trying it out (though note that a free account comes with limitations). Either way, you will need to connect your credit card or other payment method to your google cloud account.
Step 1: Go to console.cloud.google.com and log in.
Consider setting a cloud budget for your Google Cloud account in order to make sure you don't accidentally spend more than you wish to.
Step 2: Enable the Kubernetes Engine API.
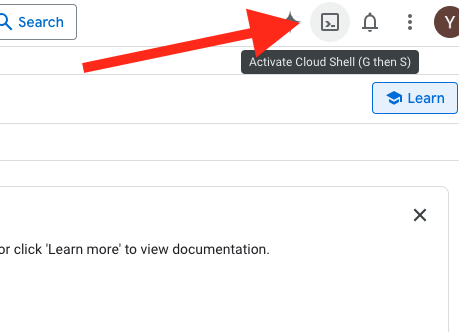
Step 3: Open Google Cloud Shell
Start Google Cloud Shell from the console by clicking the terminal icon in the top-right corner (shown below). This gives you a virtual machine with gcloud, kubectl, and other tools preinstalled. Files saved in your home directory persist across sessions. Cloud Shell also provides a VS Code-based editor for convenient file editing.
Step 4: Choose a Zone and Machine Configuration
The most complex part of deploying on GKE is choosing the proper machine types — Google Cloud offers hundreds of options. To balance budget and performance, you need to evaluate your compute requirements, budget constraints, and expected maximum concurrent users. You can describe your use case to Google Cloud's built-in Gemini assistant and ask it to recommend a suitable setup. Use the Google Cloud Pricing Calculator to estimate costs.
4.1 Select a zone
Browse the available zones: https://cloud.google.com/compute/docs/regions-zones#available
The examples below use zone europe-central2 (Warsaw)
4.2 List available GPUs in the zone
Not every zone offers every GPU model, so the first step is to confirm which zones actually carry the GPU you want to use. For this deployment the recommended models are:
- NVIDIA T4 (
nvidia-tesla-t4) — inexpensive, widely available, good fit for most interactive notebook workloads. - NVIDIA RTX PRO 6000 (
nvidia-rtx-pro-6000) — high-end workstation GPU with much more VRAM; use it when user sessions need heavier 3D rendering or larger models. Only available in a limited set of zones.
List the accelerators offered in a given zone:
gcloud compute accelerator-types list --filter="zone:( europe-central2-b )"
Example output:
NAME: nvidia-tesla-t4
ZONE: europe-central2-b
DESCRIPTION: NVIDIA T4
If the model you want is not listed, try another zone, or use the global filter to find all zones that carry it:
gcloud compute accelerator-types list --filter="name:nvidia-rtx-pro-6000"
Do not pick accelerator types with the
-vwssuffix (e.g.nvidia-tesla-t4-vws). These are NVIDIA RTX Virtual Workstation variants intended for Compute Engine VMs and are not supported by GKE — node pool creation will fail withInvalid accelerator type specified. "nvidia-tesla-t4-vws" is not supported..
4.3 List available machine types in the zone
This step is to decide how much CPU and RAM each GPU node will have. Pick a machine family that is compatible with the GPU model you chose in 4.2 — not every machine type can be attached to every GPU. For example, T4 only works with N1 machines, while RTX PRO 6000 requires specific G-series (e.g. g4-standard-*) instances. The compatibility matrix is documented here: https://docs.cloud.google.com/compute/docs/gpus
Once you know which family you need, list the instance sizes available in your zone (replace n1-standard with the family that matches your GPU):
gcloud compute machine-types list --filter="zone:( europe-central2-b ) AND name:n1-standard*"
Example output:
NAME: n1-standard-4
ZONE: europe-central2-b
CPUS: 4
MEMORY_GB: 15.00
DEPRECATED:
Step 5: Create the Cluster
First, create a cluster with a single node for running BinderHub core services (API server, image builder, etc.). For a small deployment this node does not need many resources.
- Zone:
europe-central2-b - Machine type:
n1-standard-2(2 vCPUs, 7.5 GB memory)
gcloud container clusters create \
  --zone europe-central2-b \
  --machine-type n1-standard-2 \
  --disk-size 50 \
  --num-nodes 1 \
  --cluster-version latest \
  vrb-gpu
This may take several minutes to complete.
If cluster creation fails due to insufficient resources in the selected zone, delete the cluster and try again — either in the same zone or a different zone:
gcloud container clusters delete vrb-gpu --zone europe-central2-b --quiet
Step 6: Add a GPU Node Pool
This step creates the dynamic, autoscaling node pool that runs user containers (Jupyter sessions). Thanks to --enable-autoscaling with --min-nodes 0, Google Cloud automatically provisions new GPU nodes when user pods are scheduled and reclaims them when idle, so you only pay for GPU nodes while users are actually running sessions. This pool should be in the same zone as the cluster.
gcloud container node-pools create user-pool \
    --cluster vrb-gpu \
    --zone europe-central2-b \
    --machine-type n1-standard-8 \
    --accelerator type=nvidia-tesla-t4,count=1,gpu-driver-version=default,gpu-sharing-strategy=time-sharing,max-shared-clients-per-gpu=4 \
    --disk-size 100 \
    --num-nodes 0 \
    --enable-autoscaling \
    --min-nodes 0 \
    --max-nodes 1 \
    --spot \
    --node-labels hub.jupyter.org/node-purpose=user \
    --node-taints hub.jupyter.org_dedicated=user:NoSchedule
| Parameter | Description |
|---|---|
--cluster | Target cluster name |
--zone | Must match the cluster's zone |
--machine-type | VM type for each node — n1-standard-8 provides 8 vCPUs and 30 GB memory |
--accelerator | Attach 1 NVIDIA Tesla T4 GPU per node, auto-install the driver, and enable GPU time-sharing so each physical GPU is advertised as 4 virtual GPUs (max-shared-clients-per-gpu). Increase this value to allow more concurrent user pods per GPU. These flags cannot be added to an existing pool; you must recreate it to change them. |
--disk-size | 100 GB boot disk per node |
--num-nodes | Initial node count — set to 0 so no nodes run until needed |
--enable-autoscaling | Enable the cluster autoscaler for this pool |
--min-nodes | Scale down to 0 when idle, saving cost |
--max-nodes | Scale up to at most 2 nodes under load |
--spot | Use Spot VMs for this pool — significantly cheaper than on-demand GPU nodes (often 60–90% off), but Google Cloud may preempt (reclaim) the node at any time with ~30 seconds notice. Affected user sessions will be terminated and rescheduled on a new node. Acceptable for interactive notebook workloads; remove this flag if you need guaranteed availability. |
--node-labels | JupyterHub uses this label to schedule user pods onto this pool instead of the main node |
--node-taints | NoSchedule taint prevents non-user workloads (e.g., BinderHub core services) from landing on GPU nodes, reserving them exclusively for user sessions |
List node pools:
gcloud container node-pools list \
    --cluster vrb-gpu \
    --zone europe-central2-b
Delete a node pool:
gcloud container node-pools delete user-pool \
    --cluster vrb-gpu \
    --zone europe-central2-b
Troubleshooting: GPU Quota
New GCP accounts typically have a default GPU quota of 0. If the GPU node pool fails to create, you need to request a quota increase:
- Go to IAM & Admin → Quotas in the GCP console.
- Search for
GPUs (all regions)or a specific model (e.g.,NVIDIA T4 GPUs). - Select the relevant quota, click Edit Quotas, and request an increase (e.g., from 0 to 1).
- Provide a brief justification and submit. Approval may take up to two business days.
Once the quota is approved, retry creating the GPU node pool.
Step 7: Verify the Cluster
Check that all nodes are registered and in Ready status:
kubectl get nodes
Expected output:
NAME                                      STATUS   ROLES    AGE   VERSION
gke-vrb-gpu-default-pool-xxxxx-xxxx       Ready    <none>   10m   v1.xx.x
Note: If the GPU node pool has
--min-nodes 0, its nodes will not appear until a user pod is scheduled. Only the default pool node is expected at this point.
Also verify that all system pods are running:
kubectl get pods -A
All pods should show Running status.
The GKE cluster is now ready. Continue to Chapter 2 for BinderHub deployment.
Option B: Self-Hosted with MicroK8s
We use MicroK8s(v1.32.13) as the Kubernetes distribution, as recommended by the JupyterHub docs.
Step 1: Hardware Preparation
A typical self-hosted cluster consists of a control plane node and one or more worker nodes:
| Role | GPU | Description |
|---|---|---|
| Main node (control plane + worker) | NVIDIA RTX GPU | Workstation acting as both control plane and worker; runs the K8s control plane, build docker images |
| Worker node 1 | NVIDIA RTX GPU | Additional workstation that runs user pods |
| Worker node 2 | NVIDIA RTX GPU | Additional workstation that runs user pods |
The control plane schedules workloads and manages cluster state; worker nodes execute them. All user pods (Jupyter sessions) land on worker nodes.
Minimum recommended specs per node:
| CPU | 16+ cores |
| RAM | 32 GB+ |
| Storage | 500 GB+ |
| GPU | NVIDIA RTX 2070 or newer |
| OS | Ubuntu 22.04 or newer |
Network: All nodes must be on the same local network (e.g. 192.168.1.0/24) and assigned static IPs so cluster addresses never change after a reboot:
| Node | Example IP |
|---|---|
| Main node (control plane) | 192.168.1.10 |
| Worker node 1 | 192.168.1.11 |
| Worker node 2 | 192.168.1.12 |
If your nodes span different networks, see Option C: Cross-Internet Cluster with WireGuard VPN.
Step 2: Install GPU Drivers
Ensure the NVIDIA GPU driver is installed on every workstation before proceeding. Follow the official installation guide: https://ubuntu.com/server/docs/how-to/graphics/install-nvidia-drivers/
After installation, reboot each machine and verify with nvidia-smi — it must show your GPU model and driver version. Do not continue until this is confirmed on all nodes.
Step 3: Install MicroK8s on all nodes.
3.1 Install
# Latest stable version
sudo snap install microk8s --classic

# Or pin to a specific version
sudo snap install microk8s --classic --channel=1.32/stable
To list available versions: snap info microk8s
3.2 Verify
After installation, wait a few minutes for MicroK8s to fully start up, then run:
watch "microk8s.kubectl get pods -A"
MicroK8s is ready when all pods show Running status. Expected output:
NAMESPACE        NAME                                                     READY   STATUS    RESTARTS          AGE
kube-system      calico-kube-controllers-759cd8b574-4vmt2                 1/1     Running   14                510d
kube-system      calico-node-7szkr                                        1/1     Running   0                 103d
kube-system      coredns-7896dbf49-xzx6m                                  1/1     Running   14                510d
If pods are stuck in Pending or CrashLoopBackOff, use these commands to investigate:
microk8s.kubectl describe pod -n <namespace> <pod-name>
microk8s.kubectl logs --previous -n <namespace> <pod-name>
Common cause: firewall blocking internal cluster traffic. MicroK8s requires free communication between pods over the cni0 network interface. If ufw is enabled, it may silently drop this traffic. Fix:
sudo ufw allow in on cni0
sudo ufw allow out on cni0
sudo ufw default allow routed
After applying the rules, restart MicroK8s:
sudo snap restart microk8s
Step 4: Configure the Main Node
Run the following on the main node (control plane) only.
4.1 Install Docker
BinderHub uses Docker to build images. Install it on the main node:
curl -fsSL https://get.docker.com | sh
sudo usermod -aG docker $USER
Log out and back in for the group change to take effect, then verify:
docker --version
4.2 Shell Aliases
Add to .bashrc to avoid the microk8s. prefix:
alias kubectl='microk8s kubectl'
alias helm='microk8s helm'
4.3 Enable Addons
# Core addons
microk8s enable dns
microk8s enable helm3
microk8s enable hostpath-storage
microk8s enable community
microk8s enable dashboard

# NVIDIA GPU Operator (installs device plugin, container runtime, monitoring)
microk8s enable nvidia
Note: MetalLB (load balancer) is installed in Step 6, after all worker nodes have joined the cluster.
Verify all addons and pods are healthy:
microk8s.kubectl get pods -A
Step 5: Add Worker Nodes to the Cluster
Reference docs: https://microk8s.io/docs/clustering
5.1 Join cluster
On the main node, generate a join token:
microk8s add-node
command will output:
From the node you wish to join to this cluster, run the following:
microk8s join 192.168.122.172:25000/fd2bcf0daba9515b10a232ed60594c76/4fee84ba7f3f

Use the '--worker' flag to join a node as a worker not running the control plane, eg:
microk8s join 192.168.122.172:25000/fd2bcf0daba9515b10a232ed60594c76/4fee84ba7f3f --worker

If the node you are adding is not reachable through the default interface you can use one of the following:
microk8s join 192.168.122.172:25000/fd2bcf0daba9515b10a232ed60594c76/4fee84ba7f3f
Run the output microk8s join command on a worker node:
microk8s join <master-ip>:25000/<token>
Note: Each join token is single-use — run
microk8s add-nodeon the main node once per worker to generate a fresh token.
5.1 Verify nodes appear:
microk8s kubectl get no
should output:
NAME               STATUS   ROLES    AGE    VERSION
main-node          Ready    <none>   229d   v1.32.13
gpu-worker1        Ready    <none>   67d    v1.32.13
gpu-worker2        Ready    <none>   67d    v1.32.13
Step 6: Install Load Balancer (MetalLB)
MetalLB provides LoadBalancer-type services for bare-metal clusters. It must be installed after all worker nodes have joined, as it assigns IPs from your local network range.
microk8s enable metallb:<IP-RANGE>
Choose an unused IP range within your local network subnet. For example, if your nodes are on 192.168.1.0/24:
microk8s enable metallb:192.168.1.200-192.168.1.210
Verify MetalLB is running:
microk8s.kubectl get pods -n metallb-system
All pods should reach Running status. BinderHub services will be assigned IPs from this range when deployed.
The Kubernetes cluster is now ready. Continue to Chapter 2 to deploy BinderHub.
Option C: Cross-Internet Cluster with WireGuard VPN
If your nodes are geographically distributed (e.g. one node at a university, another at a data center), they cannot reach each other directly. WireGuard creates a private virtual network over the internet so that MicroK8s sees all nodes as if they were on the same LAN.
Architecture
One node acts as the VPN server (it must have a public IP or a port-forwarded address). All other nodes connect to it as VPN clients. Once the VPN tunnel is up, MicroK8s is configured to use the VPN IPs for cluster communication.
[Main node]  ←──── internet ────→  [Worker node 1]
10.0.0.1 (VPN)                      10.0.0.2 (VPN)
203.0.113.10 (public IP)            behind NAT